
Coding can be a overwhelming at first, especially if you’ve never coded anything before, but it’s not as complicated as it seems. Ren’Py uses the coding language Python and has a bunch of inbuilt functions to make coding games easier.
I had no idea how to code when I first started making adult visual novels, so I had to teach myself by Googling every specific thing I wanted to learn. I spent hours trawling the internet for the information I needed, which is why I wanted to make this guide. Now you won’t have to search through multiple forums and websites for the basic skills you need because everything you need to get started is right here.
It’s entirely possible to create a visual novel using only the information on this page. I’d recommend reading through the guide, then using it as a reference to create you’re own visual novel. It’s a good idea to make a small practice game so that you can get used to coding before starting your own project. And if that’s something you want to do, I’ve put together a folder of 180 images from my game that you can use if you haven’t made any images of your own yet. This way you’re able to practice making a visual novel and understand the basics before starting your magnum opus.
I’m also going to assume you have Ren’Py and VS Code set up already, but if not, here’s a short YouTube video I found that explains how to do that.
Getting Started
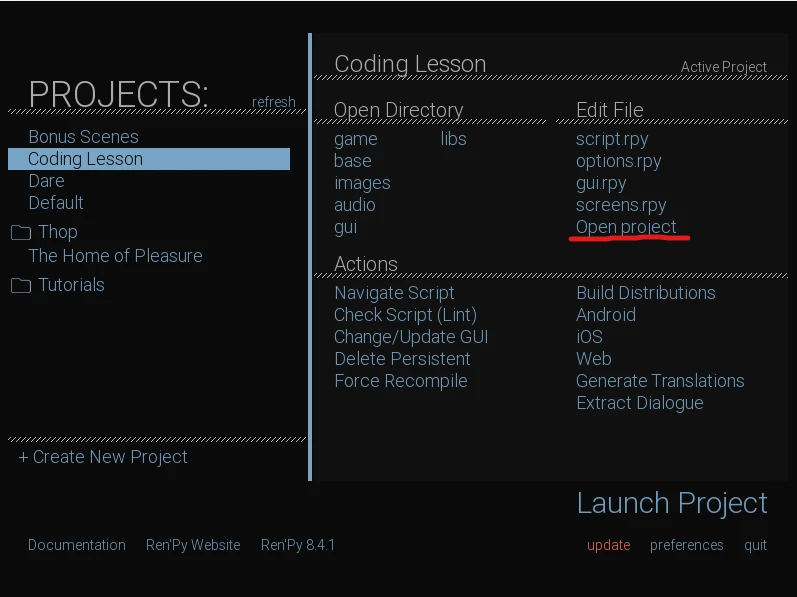
Open Ren’Py and create a new project. First you’ll have to name the project. It is possible to rename a project so if you’re struggling to come up with a name for your visual novel, it’s not a big deal.
Next, you’ll set the resolution of your game. The default is 1920×1080. I recommend using the default setting because larger resolutions require larger images, which in turn means larger file sizes. And if you’ve got thousands of 4k (3840×2160) images in your game, it can quickly hit 10GB in size. That’s not ideal for a visual novel. But you can still use 4k renders in a game set to 1920×1080 so there really isn’t any need to use anything other than the default resolution. You can learn about resizing images here and why it’s better to do that, but if this is your first time using Ren’Py you don’t have to worry about that yet, just set the resolution to default.
Once the resolution is set, choose whichever colour scheme you want. This can all be customised at a later date, but I’m not going to cover any of that in this guide.
The project you’ve created will then be added to your projects folder. To start coding, select the project you just created and click ‘Open Project’ at the bottom of the Edit File section. This will open Visual Studio Code if you’ve got everything set up correctly. (To play your game, click ‘Launch Project’ in the bottom right).
The first time you open VS Code, there won’t be any files open. In the explorer tab on the left, click ‘game’ to view your game’s files. The .rpy files are your code files.
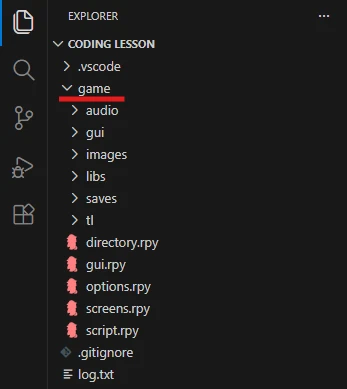
Click script.rpy to open the main script file. It should look like this:
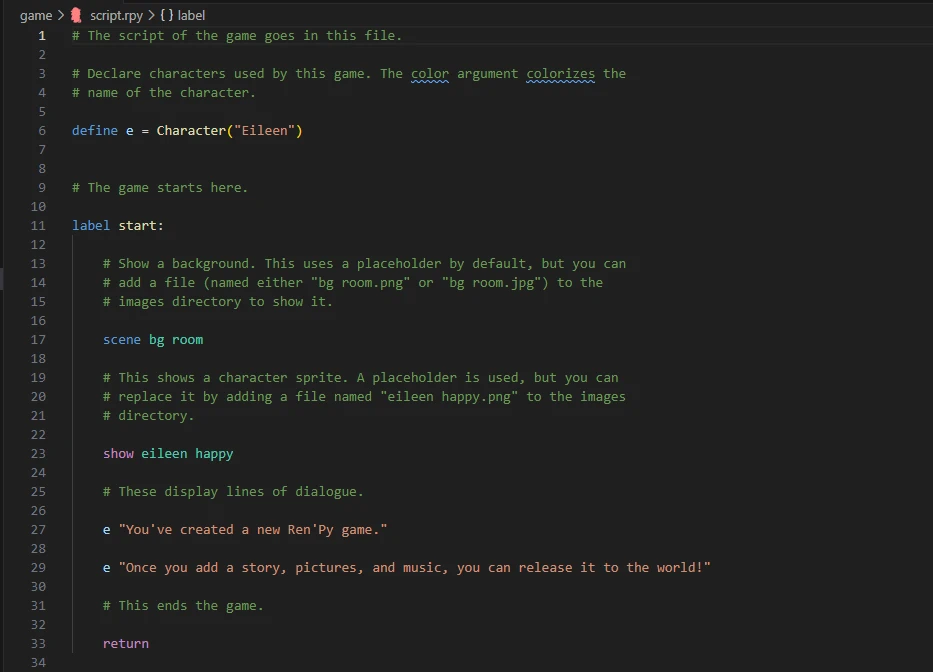
Delete everything in this file. We’re going to start from scratch so you understand how it all works.
Create a New .rpy File
The first thing we’ll do is create a new .rpy file to store all of your variables.
Larger games require multiple .rpy files to keep them organised. If your entire game is written inside a single .rpy file, it can quickly become confusing and get difficult to find what you’re looking for. That’s why it’s always better to set up an organised work space early on instead of trying to reorganise a jumbled mess later. For reference, The Home of Pleasure (my game) has 24 .rpy files. You also don’t have to do anything to connect these files. When the game is played, Ren’Py views all of these files at once and takes what it needs from each of them to create the game.
While in VS Code, press ctrl + N to create a new text file. However, a text file isn’t what we want so press ctrl + shift + S to ‘Save as’. Name it directory (or variables or whatever you want), then click the ‘Save as type’ dropdown menu and select Ren’Py. Then click save. This will turn the text file into a usable .rpy file.

Setting Up Your Characters
Visual novels revolve around the characters in the story, so the first thing we’re going to do is code our first character variable. These tell Ren’Py what name to display above the dialogue box when the game is played.
Characters
![]()
There are two ways to set up a variable; define or default. Define is for variables that won’t change. Default is for variables that can change, so for character names you’ll want to use define. Default will work, but it’s not needed unless the player is able to rename the character (we’ll get to that later).
s is what I’ve named the variable and is what we’ll use in the script.rpy file to tell Ren’Py that ‘Sophie’ should be displayed above the dialogue box. You can name your variable anything you want, but you’ll be using this a lot so the shorter the better. That’s why I’ve used the first letter of the character’s name. It’s short and I know what character it represents. All variable names must be unique too, so if you had a character called Sophie and another called Suzie, you’d have to name the second variable something like ‘sz’ for Suzie.
s = Character( ) tells Ren’Py what type of variable s is and how to use it. In this case, it’s telling Ren’Py that s is a character variable and the contents of the brackets should be displayed above the dialogue box when the game is running. “Sophie” is the name that will be displayed.
To choose what colour the name appears as, type color = “#0000”. Don’t forget to add the comma to separate the commands. A little box will appear if you’ve typed the command correctly. You can now click the box and change the colour to anything you want. If you’re not American, you’ll have to get used to the American spelling when coding as the correct spelling of colour doesn’t work here (I’m joking, chill out).
You can now copy and paste this code as many times as you need for all of your characters. All you have to do is change the name of the variable (s), the name of the character (Sophie), and pick a new colour.
The Narrator
Next we’ll set up the narrator. This will be used for descriptions, narration, or any time a character isn’t talking but you want to display words in the dialogue box.
You don’t technically need to set up a variable for your narrator, but I ran into issues with my game so I had to add a narrator to fix a bug. That meant going over every single line of code and retroactively adding the variable. This wasted hours, so for how simple this is to do at the start, you’re better off creating the variable now instead of finding out you need to create it later.

This is exactly the same as before, except the name section is left blank and the colour code isn’t needed. You could also type narrator here and give it a colour if you wanted to.
The Basics of Coding a Visual Novel
Now we’re going to set up our first scene. Save your changes then go back to the script file. (You should save your work regularly so that you don’t lose any progress you’ve made.)
Using Labels

A label is essentially a block of code. Everything you want to happen in your opening scene will be coded inside this label. The blue word label is an in-built function that tells Ren’Py that this is the start of the block of code.
The yellow word is what we’ve named this label. Each label name must be unique. Your first label will also need to be named start as that is the label you will be sent to when you start a new game in the main menu.
‘:’ indicates that everything that’s indented below this point is part of this label.
return is what returns you to the main menu when this block of code is finished. It is also indented because it is part of that label. All code follows strict indentation rules, so everything after a colon should be indented to the next indent. Pressing tab on your keyboard automatically sets you to the next indent.
Adding Images
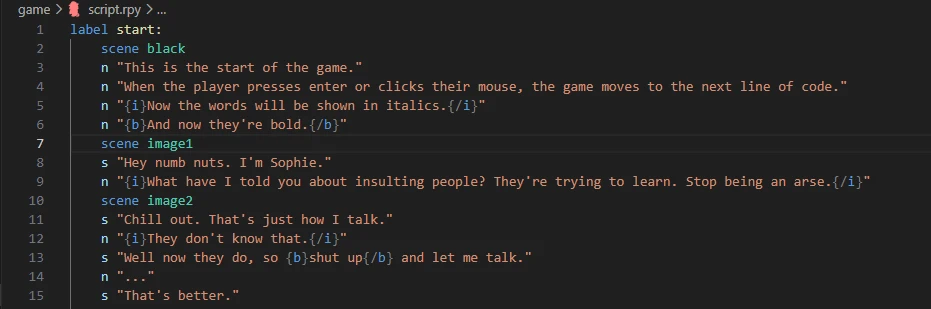
scene is blue because it’s a function built into Ren’Py that’s used to place an image into the game. The light blue word is the name of the image you want to be placed. black is an image that already exists inside Ren’Py so typing scene black will add a fully black image to the game. image1 and image2 are the names of images I’ve added to my project’s files. The words typed here must be an exact match of the name of the image you want to display, and must therefore all be unique.
If you don’t have any images yet, I’ve included a download link to a folder full of images from my game in case you need something to practise with.
To add images to your project, you need to paste them into the images folder of the project files. The file path to get there is shown below.
![]()
Now when you add the name of an image to each scene tag, the game will pull that image from the files and display it in the game. When done this way, Ren’Py will also search all of the project’s sub-folders so you are free to organise your files any way you want without having to worry about telling Ren’Py exactly where to find each image.
This method works perfectly if you’re making all of your renders in software like Daz or Honey Select and adding them to the game as is. However, if you want to add character sprites over the top of images, the in built tutorial in Ren’Py teaches you how to do that.
Using Character Variables
n and s are the names of the character variables we added to our directory earlier. They are now being used to tell Ren’Py which character is speaking. This adds their name to the in-game dialogue box (s adds Sophie and n leaves that name blank).
All of the words inside of the speech marks will then be added to the dialogue box.
Using Bold and Italics
You’ll also notice that I’ve added {i} and {b} in some places. Everything after {i} will be in italics. {/i} tells Ren’Py when the italics ends. {b} follows the exact same principal but is for bold. The start and end of every line you want to italicise or make bold should have these markers, even if the following line has the same setting.
I’ve included this because developers often use italics and bold in dialogue. In my game, all narration is done in italics to instantly tell the reader that it’s not a character talking. I sometimes use bold in speech but also for sounds I’m describing. So for example: n “{b}Knock. Knock.{/b}”. I also do character thoughts inside brackets. So, s “(I’m thinking.)” tells the player that these are thoughts and not spoken words. All devs have their own conventions when it comes to this, but it helps the player to easily differentiate the different types of dialogue used. As long as you’re consistent with your usage, it doesn’t matter what you choose to use for thoughts, speech, sounds, narration, etc. The player will figure it out fairly quickly on their own.
Letting the Player Name Their Own Character
Next we’ll allow the player to name the main character. This is a little more complicated than a regular variable and we do this in the script.rpy file.

$ is used to start a single line of python code. You’ll mostly use this for assigning and changing variables. In this instance, we’re creating the variable PlayerName and allowing the player to choose what is stored inside this variable. Variables are case sensitive, so typing playername wouldn’t call the variable we’ve just created. Only PlayerName would.
renpy.input( ) opens an input box inside the dialogue box that allows the player to type anything they want. Inside the yellow brackets is further instructions for Ren’Py to follow when this input box is opened.
Everything inside the speech marks will appear as words inside the dialogue box.
The comma is used to separate commands and it tells Ren’Py that you have another instruction it must follow. length=18 tells Ren’Py that the maximum number of letters allowed to be typed into the input box is 18. A limit stops the player typing something ridiculously long and ensures your dialogue doesn’t become too long for the dialogue box.
So to recap, line 17 says that the variable PlayerName equals whatever the player types into the input box.
Line 18 takes that created variable and strips any spaces that may have accidentally been added to the word. So the PlayerName variable equals the PlayerName variable stripped of spaces. There are no further instruction so the yellow brackets stay empty. or “Jay” indicates that if the player pressed enter without typing anything into the input box, then the PlayerName variable will equal Jay. or is dark blue because its a function that already exists inside Ren’Py.
So line 18 says PlayerName equals what was typed into the input box and stripped of all spaces, or PlayerName equals Jay.
The PlayerName variable is now fully set up without having to add it to your directory. This is one of the few times you’ll create a variable in game instead of defaulting/defining it first in your directory.
When done, it will look like this in your game:

So how do we tell Ren’Py to use our created variable as the player’s name? Save your changes and go back to the directory.

We use default instead of define because the variable is changeable. Everything else is exactly the same as with our other names, except this time, instead of typing the name we want to display like we did with Sophie, we tell Ren’Py to call the variable we just created and and display it’s contents instead. Square brackets are used to display the contents of the variable named inside them. So line 3 says, when mc is typed in the script file, the contents of the PlayerName variable will be displayed above the dialogue box in red.
So now that we have our player’s name, a narrator, and a character set up, you have all the knowledge you need to start writing the story of your AVN. Here’s everything together.
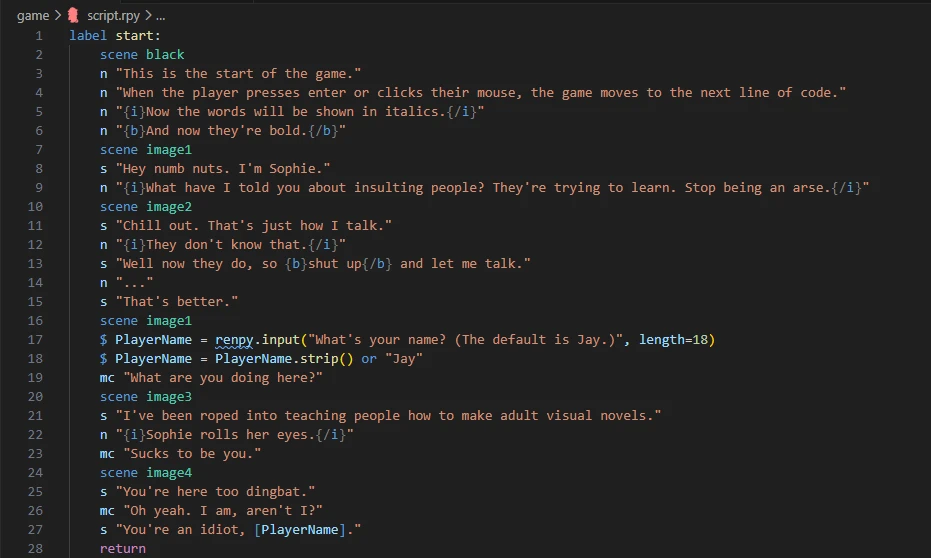
Now let’s recap. Clicking Start in the game’s main menu will start a new game and launch the start label. Ren’Py will then go line by line as the player advances through the game. The scene function changes the image displayed in game. After Sophie and the narrator have finished talking, the player can then name themself. And when they reach return on line 28, they’ll return to the main menu and the game will end.
This is the basics of making an AVN. You just keep adding lines and images to make the story unfold. And if you’re writing a kinetic novel, this is all you’ll need to know to get started. But if you want to add choices to your visual novel you’ll have to learn how to use menus and variables, so we’ll do that next.
Creating Variables
Now we’re going to go over the different types of variables that you will use when coding your VN. Save any changes you’ve made and open your directory file.
Booleans
Now we’re going to create your first non-character variable. We’ll use a Boolean for this, which is a variable that states whether something is true or false.
![]()
Default is used because the variable can change. The light blue word is the name we’ve given the variable. You can set this as anything you want, but it must be unique. It’s also best to name your variables clearly so that you know exactly what they are when looking at them in the future. Calling it something like variable1 works fine, but in three months time when you’ve forgotten what it does, you’ll have to dig through the code to find out. So instead, it’s best to give each variable a name that reflects the information it stores.
= False is the information stored in the variable. = sets the information. So this means that the variable called learning is set to False by default. False must be capitalised here for it to work as it’s a predefined function built into Ren’Py (false won’t work). You could also set this as True if you wanted. But I usually set all of my booleans to False, then set them to True when they’ve been triggered in game.
Save your changes then open your main script file.

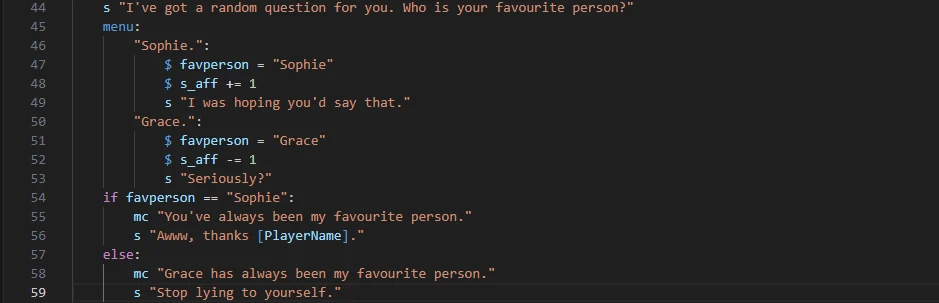
In this example, Sophie asks if the player has learned anything yet, so we give them a choice.
The menu: statement tells Ren’Py to open the choice menu screen. The words inside the speech marks on lines 30 and 33 are what will be displayed in each choice box. What happens underneath “Yes”: and “No”: is what will happen if either option is selected. So if the player clicks Yes, the learning variable will be set to True and line 32 will be displayed in the game. If the player clicks No, line 34 will be displayed in game.
Have you noticed the extra indentations in the lines of code here too? A colon is used to tell Ren’Py that this function uses the indented information that follows. So the menu has the information Yes and No inside it. Yes then has further information that will only be used if Yes is selected. If Yes isn’t selected, it will skip this extra information and not show it in the game.

The lines after the menu are no longer indented (other than the original indent that tells the game this all happens inside the start label). This means that after a choice has been selected and the contents of that choice has been shown, the game will continue as before. It doesn’t matter whether you select yes or no, line 35 will be the next thing shown after all of the code inside the selected menu choice has been completed.
So now that we’ve changed the variable. How can we use it?

This is a conditional statement (if/else) and you’ll be using this a lot. If the learning variable is set to True, Ren’Py will display the two lines indented underneath if. Otherwise, if learning is set to False, it will display the lines under else. If true, show this. Else, show that.
Notice that there are two equal signs. A single = is used to set the variable. Whereas == is used to check whether the variable is equal to what is written in this line of code, so line 37 is checking if the variable named learning is set to True. If learning is not set to True, then Ren’Py will display the code indented under else.
Strings
Booleans (True or False) aren’t the only type of variables you’ll use. A string is a variable that contains a word or collection of words, so we’ve already used a string for our PlayerName character variable. So I’ve added line 6 to my directory:
![]()
We use default because the variable will change. favperson is the name I’ve given the variable. “none” is the word that is stored inside the variable. So this line of code is saying that the variable favperson contains the word none when the game begins. Now save your changes and go back to the script file.

To set the variable, we’ll use another choice menu to let the player decide. If they choose Sophie, the favperson variable is set to contain the word Sophie. If they choose Grace, the variable is set to Grace.
Now, you might be wondering how you could use this variable in your game. We’ll use another conditional statement (if/else).

This functions exactly the same as it did with True or False before. If favperson equals Sophie, show line 53. Else (if Grace), show line 55. This works because we’ve only set two possibilities. If there were more possibilities, we’d use elif to list them. elif is short for ‘else if’. It’s like saying, if this, or if this, or if this, or that.

Ren’Py will check these variables in order from top to bottom. If Ren’Py can’t match the variable to any of the if or elif statements, then it will automatically show what’s listed under else.
Integers
Integers are used to store whole numbers without decimal places (a float is used for numbers with decimal places but it’s unlikely you’ll ever need these so I haven’t included them in the list). Integers can be used to keep track of affection points, money, and other stats so you’ll use these a lot. Save and go back to your directory.
![]()
We use default because the variable will change. s_aff is the name given to the variable and represents Sophie’s affection points. = 0 is setting the variable to zero.
Now lets add affection points to the player’s choice in our script file.
The player is given a choice. If they choose Sophie, Sophie is set as their favourite person and they gain one affection point. If they choose Grace, Grace is set as their favourite person and they lose one affection point. The single = is used to set the variable. The += is used to add the number given to the number already inside the variable. The -= is used to subtract the given number from the variable.
So how can we use integers in AVNs? As usual, the answer is conditional statements.

If the variable s_aff is over or equal to 1, Ren’Py will display line 61. Else, Ren’Py will display line 63.
This is where you’ll have to pay close attention. >= means the number inside the variable is larger than or equal to the number given. <= means the number inside the variable is smaller than or equal to the number given. You could also use > on its own to check if the variable is larger (and not equal to) the number, as well as < on its own to check if the variable is smaller than the number (and not equal to it). You can also use == to check if the variable is simply equal to the number. What you use completely depends on how you want Ren’Py to check the variable.
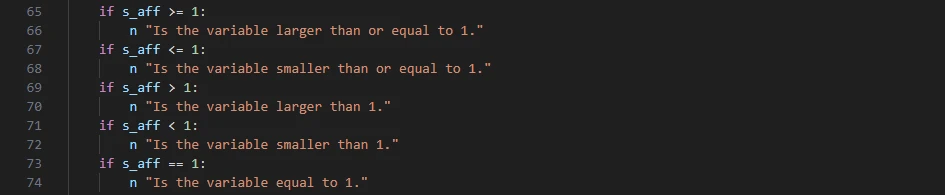
These different checks are useful when the player has collected several stat points and you want to display different scenes based on their score.

If the player has over or equal to 20 affection points, they will be shown the best scene. If they have over or equal to 10 points, they will be shown an average scene. Else, they will have 9 points or less and have failed the checks so will be shown the worst scene.
This is where you have to pay attention to the order you list your conditional statements because Ren’Py checks the code in order from top to bottom. If you put >= 10 first and >= 20 second, even if the player had over 20 points, they would only ever see the average scene because Ren’Py checked to see if they had over 10 points first, and they do so they get shown the average scene and the other two scenes are skipped.
Conditional Statements
I’ve already explained conditional statements (if/elif/else) throughout the variables section, but it’s important that you understand this so I’ll recap quickly.
if checks if a variable has met the condition you’re checking for. elif is used to check further conditions when the if check has failed. else is used show the player something when all checks have failed. However, not every conditional statement needs else.

In this case, you’re only checking to see if Sophie’s affection points are equal to or over 1. If they are, line 67 will be displayed. If they aren’t, line 67 will be skipped and the game carries on as usual. The same applies to elif. You can have if and elif without an else statement at the end. You can also list as many elif statements as you like under if. There is no limit, but your first check must be an if statement. You also have to be wary of the order you place these in to ensure all of the variables can actually be checked.
Checking Multiple Variables at the Same Time
You can also check multiple variables in a single conditional statement.
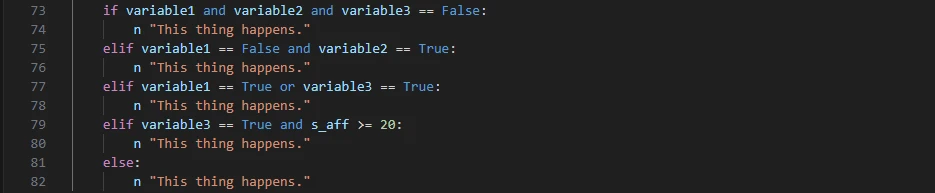
Line 73 checks if all three variables are set to False. If they are, line 74 is displayed and everything else is skipped. If not line 74 is skipped and Ren’Py will move to check line 75 to see if variable1 is False and variable2 is True. If they are, line 76 is displayed. If not, Ren’Py will check if variable1 OR variable3 is set to True, and if either of them are, it will display line 78. If not, it will check line 79 to see if variable3 is set to True and if the player has over or equal to 20 affection points for Sophie. If both of these things are correct, line 80 will be displayed. If not, none of these checks were correct so line 82 will be displayed instead.
You can use and as well as or to check variables, and you don’t need a comma to do this. Also take note that on line 73, I only use == False once because it’s checking to see if they’re all set to False. But on line 77 I have to use == True twice because I’m using or instead of and.
This can be confusing at first so my advice would be to only check one variable at a time until you get used to checking variables with conditional (if/elif/else) statements. You also likely won’t be checking multiple variables at once until you’re much further into your game, and by that point, the logic behind conditional statements will feel a lot more natural to you.
Background Characters and NPCs
Now we’ll use this knowledge of variables to create a character variable for any and all background characters in the directory. It’s better to do this because unimportant NPCs with speaking parts don’t need their own character variable. By using a single character variable for all of them, we aren’t clogging up Ren’Py with pointless variables for one off characters.
![]()
Starting backwards, on line 5 I’ve used default (because the variable will change) to create a string variable named npc_name. It doesn’t matter what you type into the contents of the variable because this will change every time you use it. I’ve used blank to indicate that the variable hasn’t been set to anything of use yet.
Then we use the npc_name variable to create our new character variable in line 4. We use default again because the variable will change. The name of the character variable is npc and is what will be typed in our script file. = Character( ) tells Ren’Py that npc is a character variable. And the contents of the yellow brackets tell Ren’Py what that variable will contain. The square brackets are then used to call the contents of a variable. So line 4 says that the npc variable is a character variable that will display that the contents of the npc_name variable in white text.

In the script file, this is how we use the npc variable. On line 64, we set the contents of npc_name to Dave. So now when npc is used on line 65, the name Dave is displayed above the dialogue box in white.
In-Game Notifications
Some devs like to tell the player when they’ve gained a stat point, earned money, unlocked a reward, passed a stat check, etc. This is done using Ren’Py’s in-built notification system.
First, we’ll save our work, then open the directory to create a new variable for the player’s money. We’ve already covered this, but repetition helps the knowledge sink in.
![]()
We use default because the variable can change. money is what we’ve named the variable. = 0 sets the contents of the variable to zero.

$ renpy.notify( ) is the statement that tells Ren’Py to place the notification screen into the game. Everything inside the yellow brackets is what Ren’Py will put inside the notification. Speech marks are used to tell Ren’Py that the words contained here are the exact words that should be displayed in the notification.
This notification screen is already set up inside Ren’Py so you don’t have to do anything to create it, and it will close by itself after a few seconds. You can also customise the notification screen, but we’re not going to talk about that in this guide.
So in the image above, let’s say the player is viewing line 65 in game. When they press enter to advance the story, Ren’Py will launch the notification screen to tell the player that money has been added to their bank account, and then Ren’Py will add 200 to the money variable. Both of these things are done instantly while the player is shown line 68. After a couple of seconds, the notification pop up will close itself.
The placement of this code is also important. Ren’Py checks the code from top to bottom, so the notification and the variable change happens when the player sees line 68 because it is written above line 68.
Using Labels
As I mentioned before, a label is essentially a single block of code. Everything that is indented underneath label start: is part of that label. So if you have choices in your game that change what events the player participates in, you’re going to need to learn how to navigate between multiple labels.
Everyone will have their own preferences with his, but I use labels specifically as scenes because it helps me keep the code organised and is easier to find what I’m looking for when I’m searching through the code. It is possible to have everything inside one big label, especially if you’re making a kinetic novel with no choices, but this still makes finding specific scenes or events difficult when you’re trying to go back and fix something. So even for kinetic novels, I’d recommend splitting your AVN into multiple labels.
Jumping To the Next Label
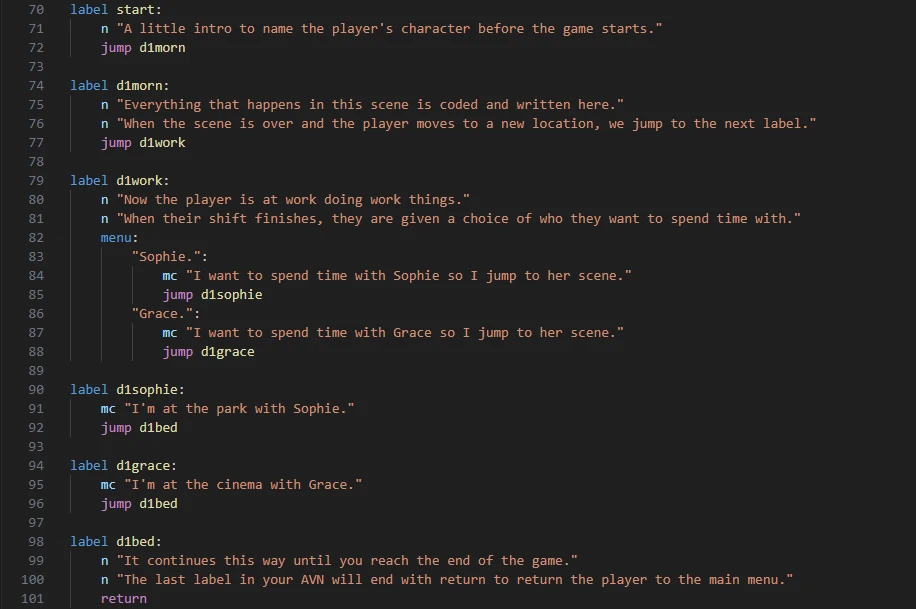
So in this example, the start label lets the player name their character, then Ren’Py jumps to d1morn where the story starts (I keep track of the days in my game, so every label starts with what day it is, followed by a keyword that represents the scene so it’s easily understood by me.) Then the main character goes to work, which is a new label for a new scene called d1work. After work, the player has a choice to spend time with Sophie or Grace. Depending on their choice, they are then sent to whichever label they’ve chosen to see. When that scene is over, they go back home to bed and the game ends.
Calling a Label
Instead of jumping to a label, you can also call a label. This inserts that called label into the current label, and when the inserted label ends, the game carries on with the original label.
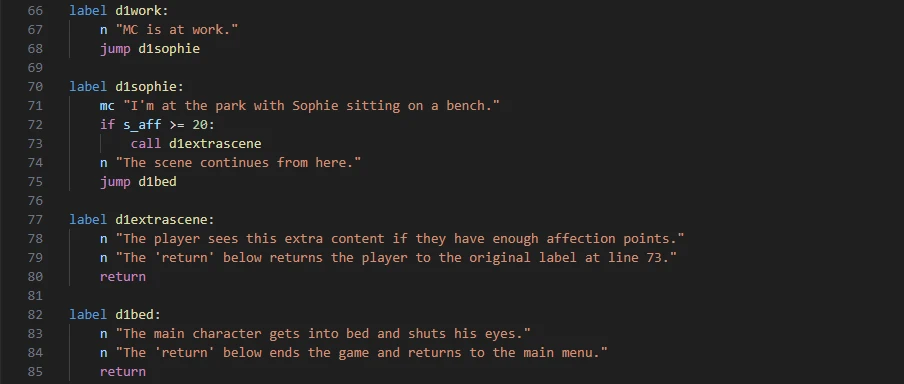
There are two return‘s used here, but only one closes the game and returns to the main menu. The other is used to return from the called label. After you call a label, the next return the game hits will return you to the point that the label was called from.
But this is where it gets complicated and you have to be careful. The called label itself doesn’t have to end in return. You could call a label that then jumps to the next label, that jumps to the next label, that jumps to another label. The game will still work. But as soon as it reaches return in the code, it’ll jump all the way back to where the original label was called from. This means that if you haven’t used jump, call, and return correctly, it’s possible to accidentally create a loop in the game that returns the player to an earlier part of the game instead of back to the main menu when they reach the end of the game.
I did this in The Home of Pleasure in one of my updates. It’s fixed now, but people who played that version and saved their game inside the loop will always have that loop in their game. So instead of the game ending where it’s supposed to, some players will be thrown back into a much earlier part of the game because I forgot to use return after a call label.
You can also call a label from inside a called label like a Russian nesting doll.
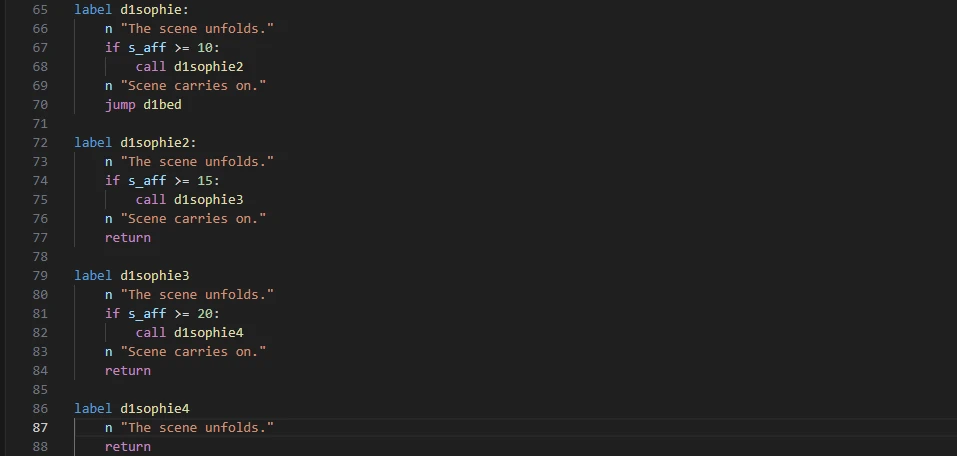
You can call as many labels as you want. But you will need a return for every call to ensure the game returns to the original point where the first label was called from. Let’s say you have over 20 affection points for Sophie, so the first label is called, then the second, third, and fourth. When the fourth label ends on line 88, it returns the player to line 83, just below the last call. Then on line 84, that return returns to line 76. Line 77’s return returns you to the original call, placing you at line 69 and allowing the game to continue on the original label thread without creating a loop.
You now have all the coding knowledge you’ll need to write and make a visual novel. But of course, this won’t be the end of your learning, this is just the basics to get you started.
Fixing Bugs
Bugs are an inevitable part of every game developer’s journey. Everybody makes mistakes and that’s okay, but you need to know how to fix them. Players will get frustrated if the game is full of bugs.
What To Do When Your Game Breaks
If you’ve played a few Ren’Py games, you’ve probably seen a screen like this at some point:
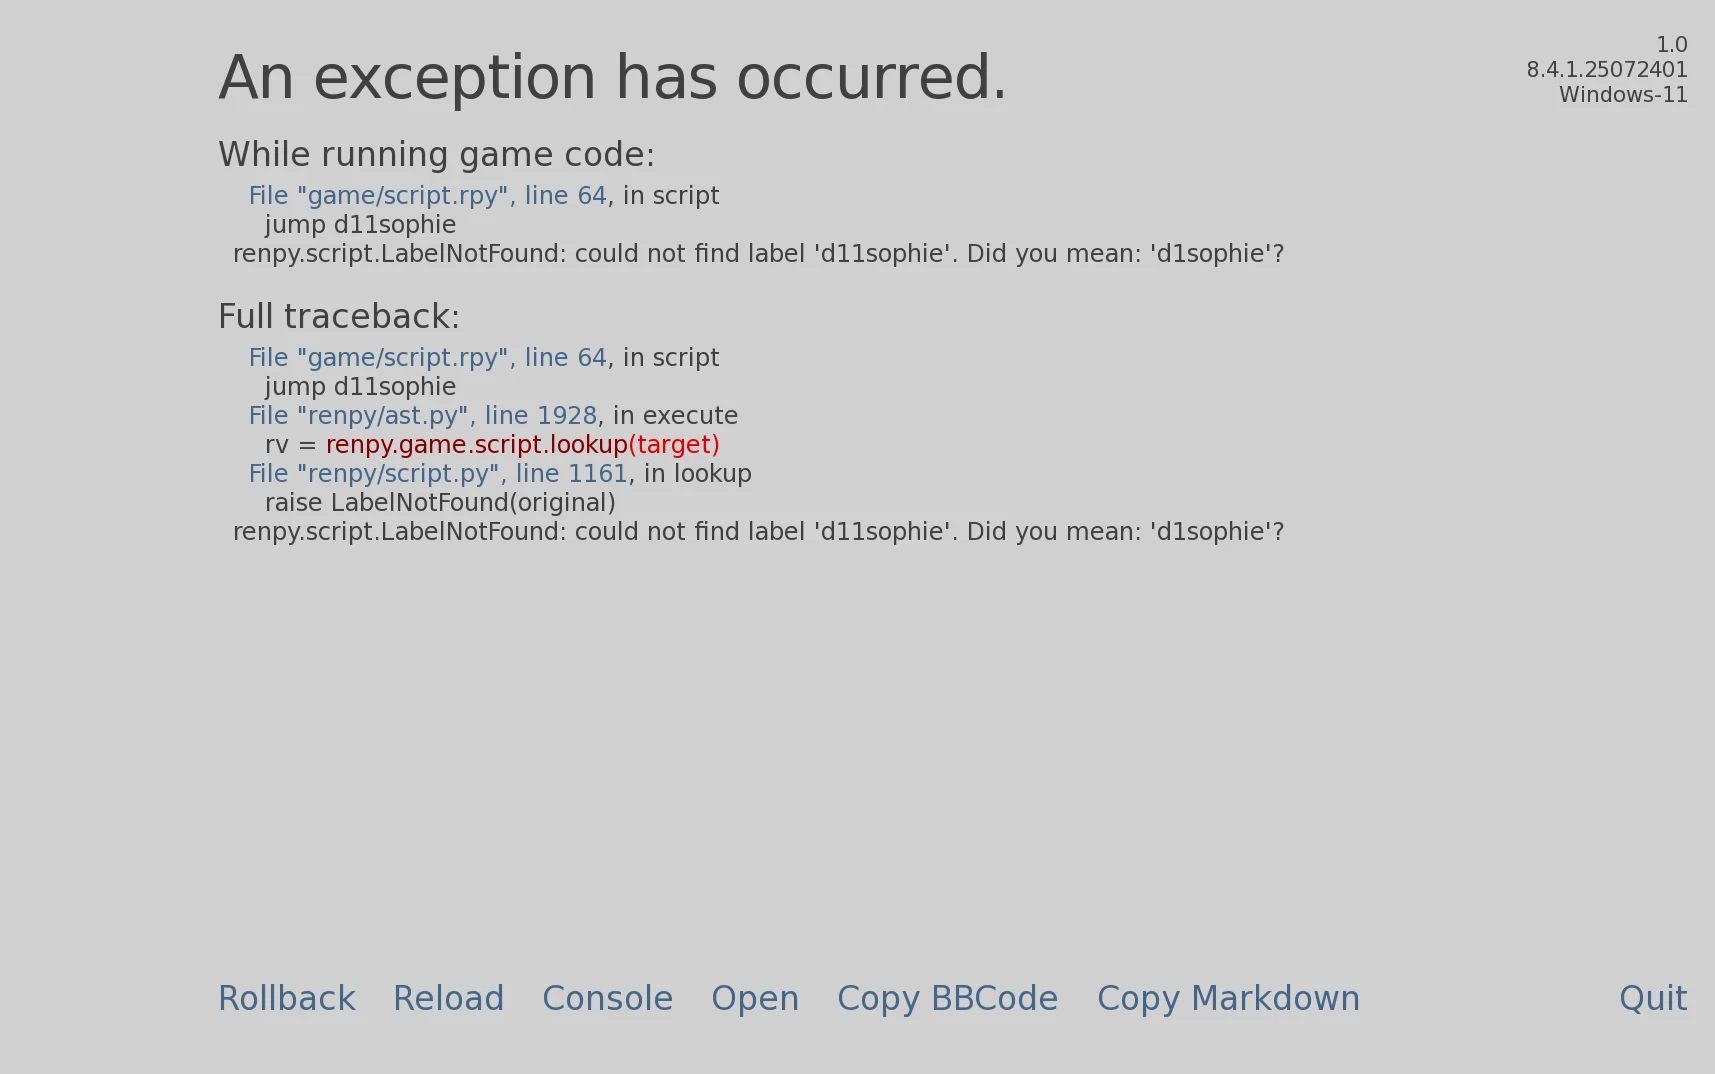
This happens when something in the game isn’t coded properly. This screen tells you why the game isn’t working.
To get this error, I’ve purposefully mistyped d1sophie as d11sophie. If you look at the last line of the section titled ‘While running game code:’, you’ll see that Ren’Py couldn’t find the label d11sophie. Then it gives you a suggestion on how to fix the problem. Ren’Py doesn’t always give suggestions, but this was on obvious mistake so it has here.
Every time you see this screen, all you have to do is check the last line of the ‘While running game code:’ section to find out what the problem is. 99% of the time, the last line will tell you exactly what the problem is. That other 1% of the time is for highly complex bugs, so you’ll have to use the ‘Full traceback:’ section to follow the problem up to where the error occurred. It’s rare that happens and for what you’re doing here, it’s highly unlikely you’ll have to do that. However, it’s still good knowledge to have which is why I’m explaining how to read this screen.
Playtesting Your Game
You’re going to spend a lot of time playing through your game and editing the writing or the code to perfect everything. Because of this, it’s important to know that you can edit the code and playtest at the same time.
Let’s say you’re playing through your game and you find a spelling mistake. So you open VS Code and fix the spelling mistake. Then you save your changes and…nothing changes in the already open game.
But you don’t have to close the entire game and reload it to see your changes. Instead, while in the game, press shift + R on your keyboard to reload the game with the new code. You’ll only need to do this once, then every time you save a script file in VS Code after that, Ren’Py will automatically reload your game with the new changes.
How to Stop the Textbox Disappearing
When you play through your game, you’ll probably notice that the dialogue box disappears and reappears every time a new image is loaded. That’s because the scene function removes everything from the screen before reloading it to show the new content. Ren’Py is coded to add a 0.2 second transition when this happens, so every time scene is used, there is a 0.2 second delay before the dialogue box is reloaded. But this has an easy fix.
Open the options.rpy file and scroll down to line 114. You’ll see this:
![]()
These two lines add a 0.2 second dissolve to the transition between each image. You don’t need that, so all you have to do is change the code to what is written below.
![]()
This removes the transitions and your game will then seamlessly transition between images without closing and reopening the dialogue box.
Making Your Own Visual Novel
Obviously there is so much more you can do, like adding music, customising the UI, adding minigames, adding point-and-click freeroams, adding a replay gallery and rewards, etc. But that’s too much to include in a single guide. Besides, you now have enough knowledge to start making you’re own visual novel.
The best advice I can give you when starting your own game is to start small. Game development is time consuming and not everyone is going to enjoy the process, so it’s better to start small and complete a little project before committing to something much larger that’s going to take years to complete. It’s also better to start small because you’ll learn a lot of new skills and improve them with time. So if you’re first project is huge, the beginning of your game will be noticeably worse than later sections due to how much you’ve improved over time. Ask me how I know.
But the most important thing to remember is to make back ups and save often. The last thing you want is to lose everything to a dying harddrive or an accidental deletion.